
How to automatically select B-roll in Premiere Pro
Use AutoEdit’s free B-roll Selector to find cleaner moments, reduce shaky handheld footage, trim unstable clip edges, and build an editable selects timeline inside Premiere Pro.

B-roll selection is often just replaying clips to find the two usable seconds between a shaky start and a blurry ending. With a long day of handheld footage, that first pass can take longer than placing the shots in the edit.
AutoEdit’s free B-roll Selector analyzes the clips and builds a selects sequence inside Premiere Pro. This guide explains what it removes, what it leaves alone, and what the editor still needs to check.
Quick Answer
Open AutoEdit Creator Mode’s free B-roll Selector, upload the raw clips, choose how much shake to remove, set how much of each unstable edge to trim, and build the selects. AutoEdit creates a shorter editable sequence; you still choose which shots belong in the story.
Video walkthrough
This FREE AI Plugin Automatically Edits B-Roll in Premiere Pro
Watch this walkthrough to see the steps in Premiere Pro, then compare the demonstrated settings and results with your own footage before applying them to a full project.
Watch This FREE AI Plugin Automatically Edits B-Roll in Premiere Pro on YouTube
1. What does an automatic B-roll selector actually do?
The selector looks for steadier parts of each uploaded clip and removes sections that cross the chosen shake threshold. It can also trim unstable edges before building a new sequence from the remaining moments.
It does not know the full story of the video. A steady shot can still be irrelevant, and an intentionally rough handheld move can still be the best moment. The output is a selects timeline, not the final B-roll edit.
What is AutoEdit?
See how AutoEdit handles repetitive editing work inside Premiere Pro while keeping the resulting timeline editable.
2. Choose the shake and edge-trim settings
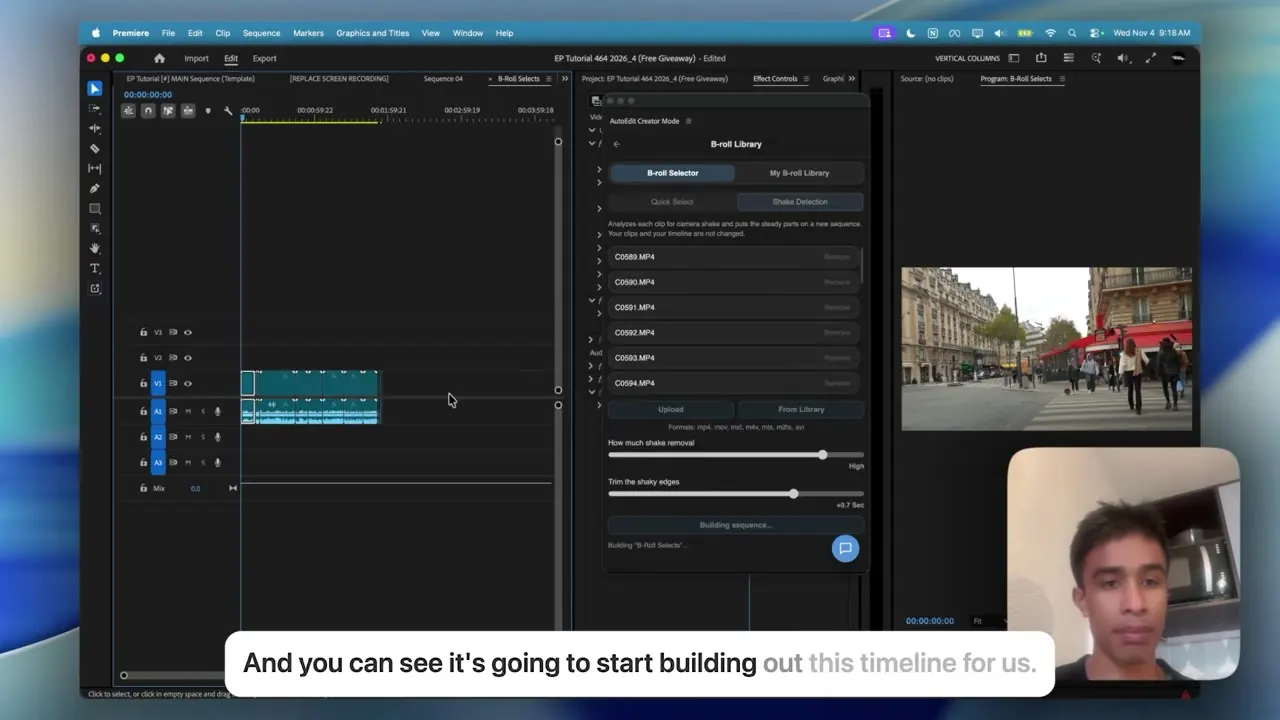
Add the raw B-roll clips, choose Shake Detection, and set how much shake the tool should remove. Use a lower setting for handheld footage where some movement is expected. Raise it when the job needs cleaner product shots or stable event details.
The edge-trim control removes a little time around unstable sections. Do not trim so aggressively that the remaining shot becomes too short to use in the edit.
3. Build the B-roll selects sequence
Upload the clips
Choose the handheld or vlog clips that need a first pass.
Run shake detection
Let the tool analyze the footage using the selected settings.
Open the new sequence
Review the shorter clips AutoEdit placed on the selects timeline.
Remove misses and restore intentional movement
Keep the final call with the editor before cutting the story.
4. When should you use Quick Selects instead?
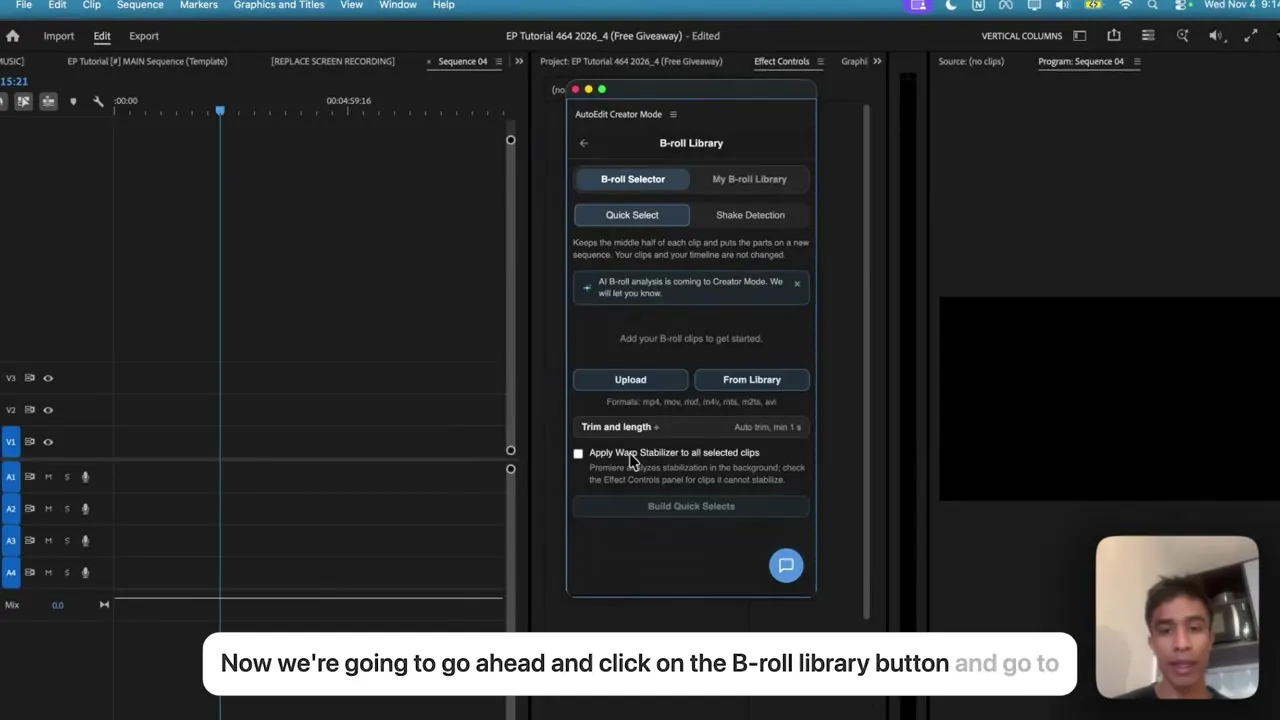
Quick Selects is the simple option when every clip only needs the same fixed amount removed from the beginning and end. It is useful when the camera operator consistently settles the shot after pressing record.
Use Shake Detection when the unstable section varies from clip to clip. Use Quick Selects when the trim rule is predictable and you do not need footage analysis.
5. Who saves the most time with B-roll selects?
- Vlog editors sorting handheld footage from a full day
- Event videographers reviewing venue, crowd, and detail shots
- Music-video editors cutting performance details and inserts
- YouTube editors preparing product and location B-roll
- Small teams that need a clean selects sequence before the main edit
Tips
- Test the first pass on a duplicate sequence.
- Watch the complete result before sending it to a client or publishing it.
- Save the settings that worked for the next video in the same series.
Common mistakes
- Treating an automatic first cut like a finished video.
- Adding effects before the basic cut is easy to follow.
- Skipping the audio, caption, and export check at the end.
Try the workflow
Free tools for this article
Use the most relevant free tool for the task, then continue with the rest of your edit.
Continue in Premiere Pro
Explore AutoEdit Creator Mode
Build an editable starting point, then keep creative control of the timeline.
Explore AutoEdit Creator ModeFrequently asked questions
Can Premiere Pro automatically select B-roll?
AutoEdit’s B-roll Selector can analyze imported clips, reduce shaky sections, trim unstable edges, and build an editable selects sequence inside Premiere Pro.
Is the AutoEdit B-roll Selector free?
Yes. The tutorial demonstrates it inside AutoEdit Creator Mode’s free tools. Current download details are available on the official product page.
Does the B-roll Selector place shots into the final story?
No. It creates a shorter selects timeline. The editor still chooses which B-roll supports each line, scene, or beat.
What is the difference between Shake Detection and Quick Selects?
Shake Detection analyzes each clip for unstable sections. Quick Selects removes a fixed amount from the beginning and end of every clip.
Sources and verification
External product claims were checked against these first-party sources.
The free B-roll Selector tutorial shows the settings, analysis, and resulting Premiere Pro selects sequence described here.
AutoEdit Creator Mode is the tracked download page for the free B-roll tool demonstrated in the tutorial.