
How to edit a vlog faster in Premiere Pro with Claude AI
A start-to-finish vlog editing guide using Claude AI for bad takes, a B-roll selector for shaky footage, reusable clip libraries, captions, sound effects, and motion graphics inside Premiere Pro.

Vlog footage gets messy fast. You have talking-head intros with repeated lines, handheld clips with shaky starts, random B-roll from the day, and the same sound effects or overlays you used in the last episode.
This guide follows Devin’s Adobe MAX Miami vlog tutorial. It shows the actual Premiere Pro timeline, the Claude review screen, the B-roll selector, and the reusable asset tools. The goal is not to hand over the entire vlog. It is to spend less time replaying obvious mistakes and hunting through folders.
Quick Answer
To edit a vlog faster in Premiere Pro, use Claude to cut repeated lines and bad takes, review every keep-or-cut decision, build B-roll selects from the cleanest parts of each clip, then add captions, sound effects, overlays, and motion graphics after the rough cut works.
Video walkthrough
How to Edit a Vlog 10x Faster With Claude AI in Premiere Pro
Watch this walkthrough to see the steps in Premiere Pro, then compare the demonstrated settings and results with your own footage before applying them to a full project.
Watch How to Edit a Vlog 10x Faster With Claude AI in Premiere Pro on YouTube
1. Start with one clean Premiere Pro sequence
Import the talking-head clips, vlog footage, music, and any repeated channel assets. Put the spoken intro in its own sequence before asking Claude to make cuts. A narrow first job is easier to review than dropping the entire day of footage into one request.
Duplicate the sequence. The duplicate gives you a clear before-and-after comparison and makes it easy to recover a take if the automatic cut is too aggressive.
What is AutoEdit?
See how AutoEdit handles repetitive editing work inside Premiere Pro while keeping the resulting timeline editable.
2. Tell Claude what the vlog is actually about
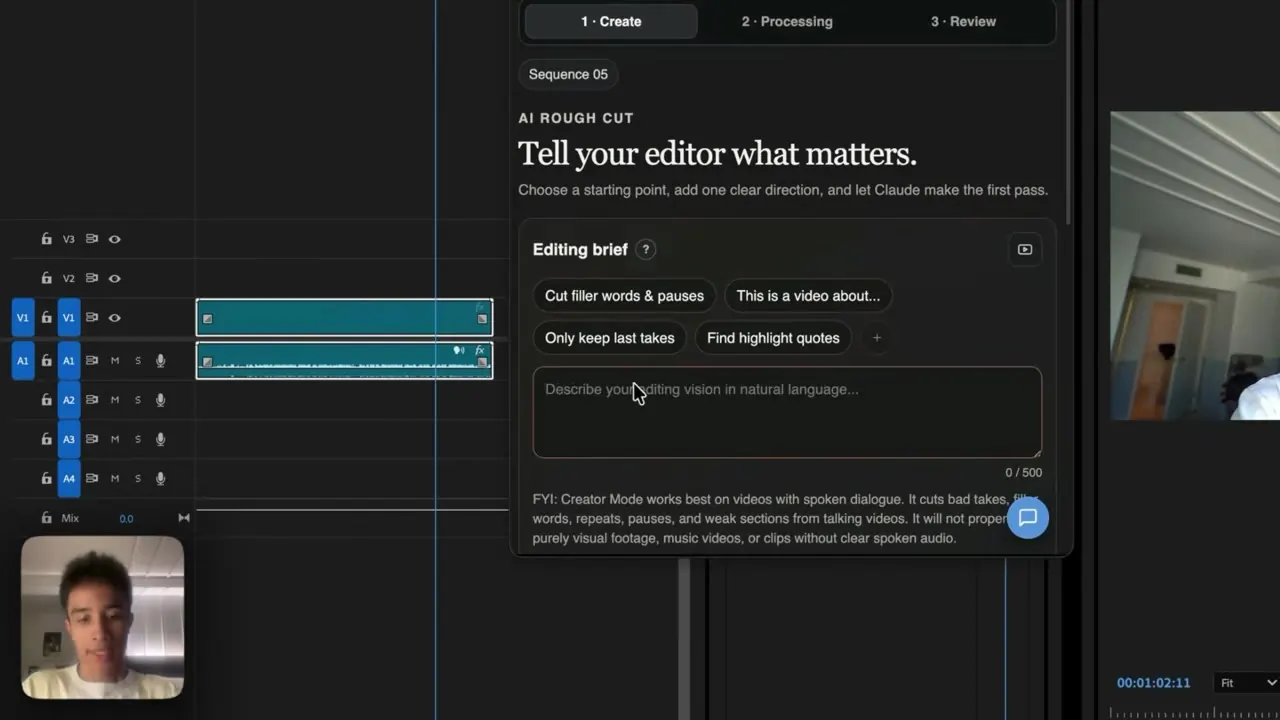
Open AutoEdit Creator Mode from Window > Extensions, choose the Claude editing tool, and describe the video in plain language. In the tutorial, the task is a casual vlog intro from Adobe MAX. The instruction asks for bad takes, repeats, filler words, and long silences to be removed while keeping the usable explanation.
Do not write a giant prompt that asks for every possible edit. Start with the spoken cut. A useful brief says which topic must stay, which repeated takes can go, and whether the delivery should feel relaxed or fast.
3. Review the cut instead of blindly applying it
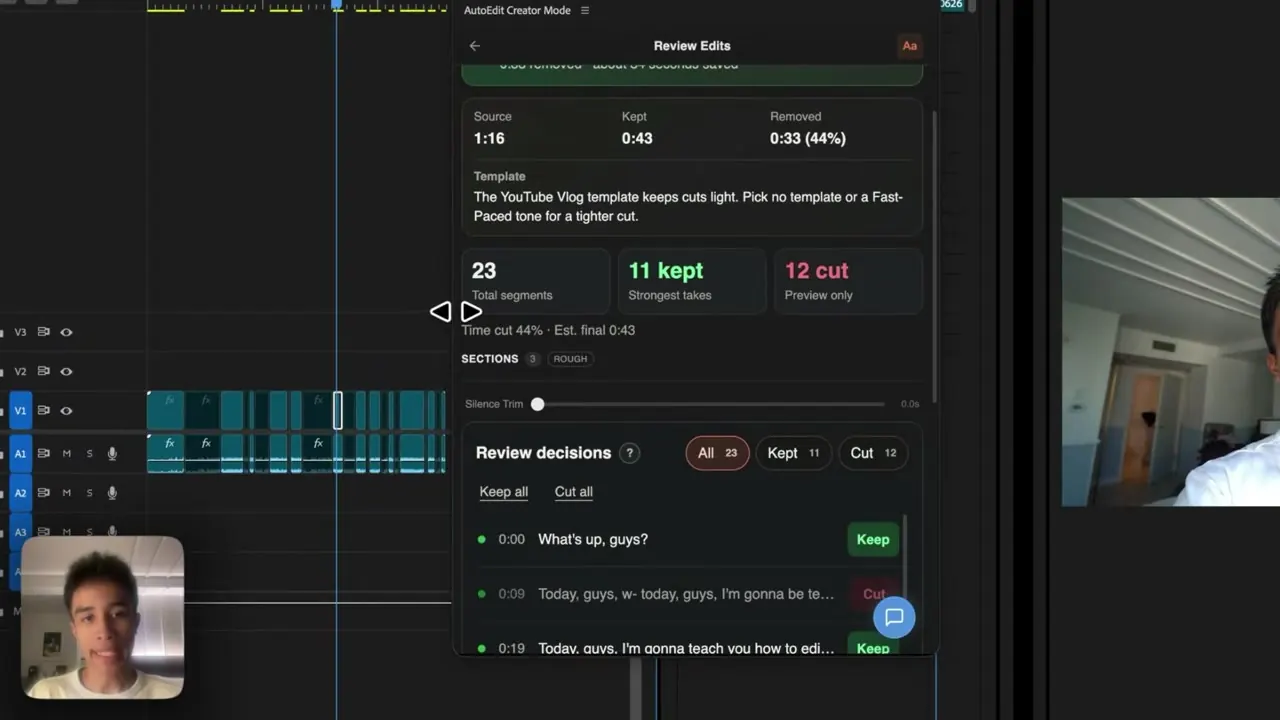
After the transcript pass, Creator Mode shows how much source material it reviewed, how many segments it kept, and which lines it wants to cut. Click through the decisions and listen across each edit.
Restore a line when it contains context the next sentence needs. Cut a repeated explanation when the later take says the same thing more clearly. You can also ask Claude to check the edit again for a specific problem instead of rerunning everything.
4. Build B-roll selects without scrubbing every clip
Open the free B-roll Selector and add the handheld clips from the vlog. Shake Detection looks for unstable sections and builds a selects sequence from cleaner moments. Adjust how much shake to remove and how much of each unstable edge to trim.
The result is not a story edit. It is a shorter bin of usable moments. Watch the selects, remove blurry frames the detector missed, and keep intentional camera movement when it helps the scene feel alive.
5. Save recurring clips instead of finding them again next week
Use the B-roll Library for clips you reuse across episodes: a channel intro, product shot, reaction, screen recording, logo animation, or location establishing shot. Sound effects and overlays have their own libraries.
Name saved assets clearly. “Whoosh short” and “Miami establishing wide” are easier to find than a camera filename. Reusing a known asset should take seconds, not another search through old project folders.
6. Add captions, sound, and graphics after the rough cut
- Run captions after the spoken cut is stable.
- Proofread names, locations, and product terms.
- Use sound effects on moments that need emphasis, not every cut.
- Add motion graphics where they explain something the footage cannot.
- Watch the vlog once without stopping before export.
Tips
- Test the first pass on a duplicate sequence.
- Watch the complete result before sending it to a client or publishing it.
- Save the settings that worked for the next video in the same series.
Common mistakes
- Treating an automatic first cut like a finished video.
- Adding effects before the basic cut is easy to follow.
- Skipping the audio, caption, and export check at the end.
Try the workflow
Free tools for this article
Use the most relevant free tool for the task, then continue with the rest of your edit.
 Free Podcast Name GeneratorGenerate podcast-name directions that fit the topic, host, and audience.Free Podcast Show Notes GeneratorTurn a podcast transcript into structured show notes, takeaways, and chapter ideas.
Continue in Premiere Pro
Explore AutoEdit Creator Mode
Build an editable starting point, then keep creative control of the timeline.
Explore AutoEdit Creator ModeFrequently asked questions
Can Claude AI edit a vlog in Premiere Pro?
Through AutoEdit Creator Mode, Claude can review the spoken transcript, suggest cuts to bad takes and repeats, and apply the approved decisions to an editable Premiere Pro sequence. You still choose the visual story, B-roll, music, sound, and final pacing.
Can AutoEdit organize vlog B-roll?
The free B-roll Selector can remove shaky sections and build a shorter selects timeline. The B-roll Library stores clips you want to reuse. Neither tool decides the complete story order for the vlog.
Should captions be added before or after the rough cut?
Add final captions after the spoken cut is stable. Otherwise, later dialogue changes can force you to regenerate or repair caption timing.
Is AutoEdit Creator Mode only for vlogs?
No. The same spoken-footage tools can be used for YouTube tutorials, interviews, podcasts, TikToks, and Reels. Give the plugin a brief that matches the type of video you are cutting.
Sources and verification
External product claims were checked against these first-party sources.
The complete vlog editing tutorial shows the Claude review, B-roll Selector, asset libraries, and final Premiere Pro timeline used in this guide.
AutoEdit Creator Mode is the tracked product page for the Premiere Pro plugin demonstrated in the tutorial.